

The history of analytics platforms is long and expensive. When I started out in data, an analytics system was something you built. As a young and spry junior engineer, I was tasked with physically racking servers in a big colo in the Seattle suburbs. These servers were full of hard-drives, which stored data using a fake-sounding mechanism involving magnets and disks rotating more than 100 times a second. And all of this storage—petabytes!—was tied together via a homegrown distributed file system. Getting data to the storage cluster involved BitTorrent. True story.
And if you wanted to query that data, you better know Java and enjoy writing Map functions and also some Reduce functions.
Today this is all a bit easier. There are several dozen cloud vendors who will happily sell you a complete stack, wrapped in a nice SQL interface. But some challenges still remain—in particular, what if you need lowish-latency access to your data? And what if you want to avoid paying millions of dollars a year?
At Arroyo, we’ve been experimenting with a new analytics stack that solves these problems. It’s built around the fundamental data innovation of our era—cheap, fast object storage—and open table formats. It relies on a log store (typically Kafka or a Kafka-compatible system like Redpanda) for initial storage, Arroyo for transformation, filtering, and ingestion, object storage (typically S3) for long-term storage, and DuckDB for ad-hoc querying. We’re calling it the LOAD stack (Log store-object storage-Arroyo-DuckDB).
It’s cheap, it’s low-latency, and can be set up in under an hour.
Table of contents
- An AWS-based LOAD stack
- Log storage
- Receiving events with Lambda
- Deploying Arroyo
- Ingesting to S3
- Querying our data lake
- Wrapping up
An AWS-based LOAD stack
We’re going to build a production-quality real-time analytics stack, using a mix of open-source software and cloud services. Many of these pieces can be easily mixed-and-matched with other services supporting the same standards (for example, we’ll use Redpanda as our log store, but this could just as easily be Warpstream, Amazon’s MSK, or self-hosted Kafka).
With the parts specced out here, we can estimate the costs (these are all assuming public pricing; at scale prices can be negotiated and will be somewhat lower):
Event rate
Message size
Retention time
The entire architecture looks like this:

This guide assumes you have an AWS account and the AWS CLI installed.
Log storage
To start with, we need somewhere to store our events before they’re processed by the streaming engine. A good system here will have the ability to durably store data (so we can’t lose it while we wait to write it to object storage) as well as the ability to “go back in time” to support exactly-once semantics. Today this describes a distributed log store—a partitioned, ordered log. The most popular system is Apache Kafka, and you can find many vendors to run it for you.
But in the last few years, Kafka has become more of a protocol than a product. Warpstream is a Kafka-compatible log store built directly on object-storage, trading latency for lower cost. Redpanda is Kafka rewritten in C++ with hierarchical storage.
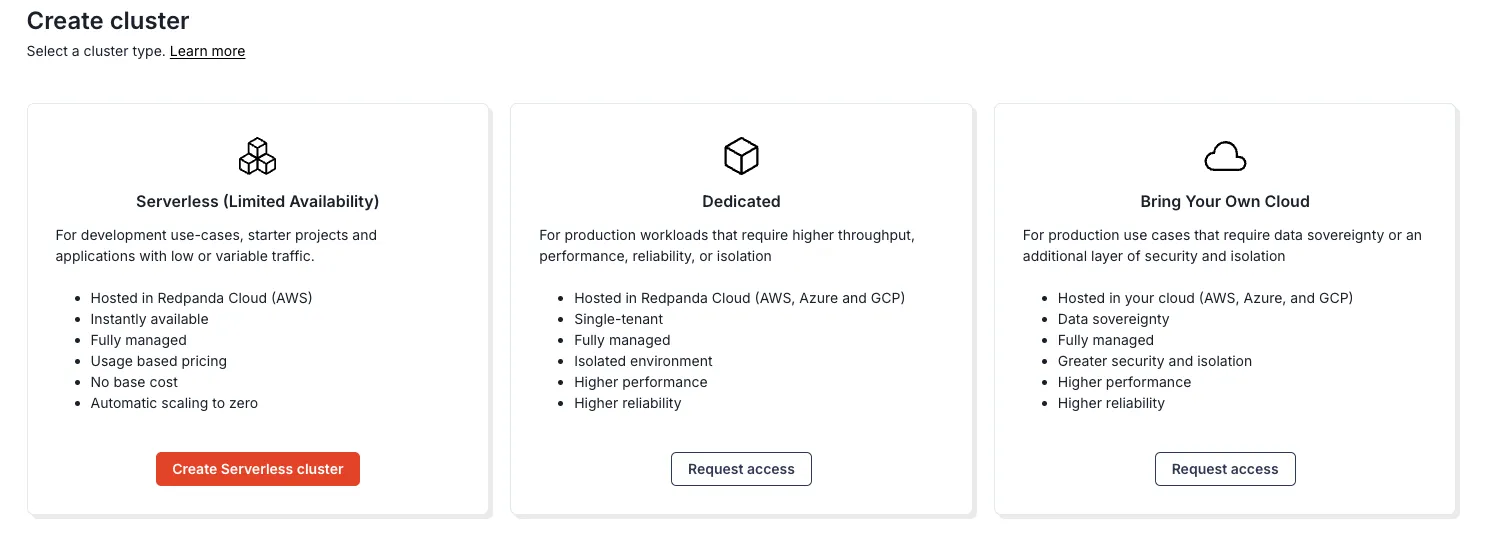
We find Redpanda Serverless provides a good balance of cost to simplicity, so that is what we use.
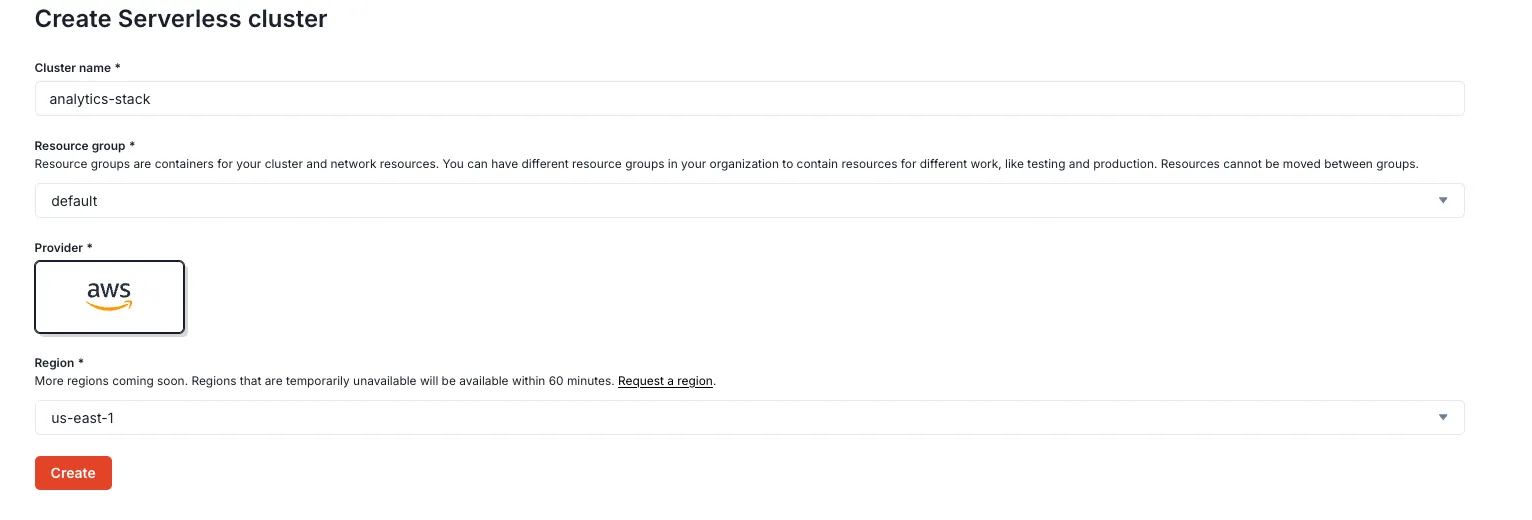
So to start, we’ll sign up for Redpanda, and create a serverless cluster in our AWS region:
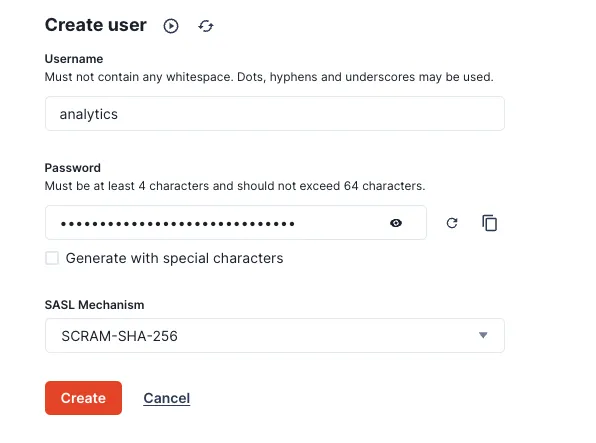
Then we’ll create a user account
We need to be able to securely provide these credentials to our services running in AWS. We’ll do that using AWS Systems Manager (SSM) which is an easy way to store and distribute configuration:
$ aws ssm put-parameter \
--name "/analytics/redpanda/username" \
--value "analytics" \
--type SecureString
$ aws ssm put-parameter \
--name "/analytics/redpanda/password" \
--value "{REPLACE_WITH_PASSWORD}" \
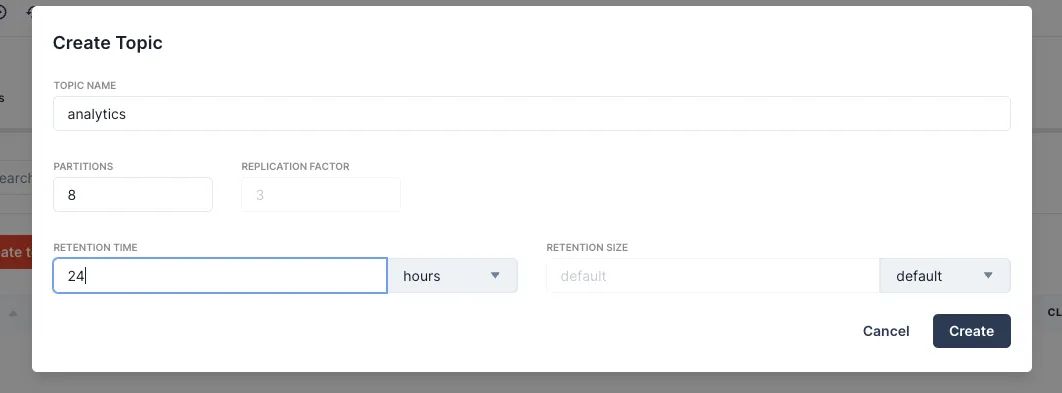
--type SecureStringNext we’ll create a topic, with an appropriate number of partitions for our data volume and our desired retention time
Lastly, we need to give our user access to our topic so that it can publish and consume messages.
We’ll do that by going into the Security tab→ACLs, clicking the analytics user we created, and clicking “Allow all operations.”
Receiving events with Lambda
Next, we need to get events into the system. For internal services we can just publish directly to Kafka, but for external events we may want an HTTP server that can receive data from mobile apps, devices, or sources. There are many ways to skin this particular cat—HTTP to Kafka—but perhaps the simplest is to use a Lambda.
We love Rust at Arroyo, and it’s also a great language for writing Lambdas in. This function is pretty simple—it receives an HTTP request, does a bit of validation, and writes it on to our Redpanda topic.
The full source code for the lambda can be found at ArroyoSystems/analytics-lambda.
To deploy it, we need to build it as a special lambda-compatible binary. It’s possible to cross-compile from MacOS (and easier on Linux), but to save effort of getting a working compilation environment, we’ve provided a Dockerfile that sets up the correct environment and builds the lambda binary.
Deploying the Lambda
To use it, clone the repo and run the build script (with Docker running):
$ git clone git@github.com:ArroyoSystems/analytics-lambda.git
$ cd analytics-lambda && ./build.sh
That will produce a lambda.zip file that we can deploy.
But before that, we need to create an IAM role for the lambda, to allow it to access our secrets:
$ export ACCOUNT_ID=$(aws sts get-caller-identity --query "Account" --output text)

$ aws iam create-role \
    --role-name IngestionLambdaExecutionRole \
    --assume-role-policy-document '{
        "Version": "2012-10-17",
        "Statement": [
            {
                "Effect": "Allow",
                "Principal": {
                    "Service": "lambda.amazonaws.com"
                },
                "Action": "sts:AssumeRole"
            }
        ]
    }'

$ aws iam attach-role-policy \
    --role-name IngestionLambdaExecutionRole \
    --policy-arn arn:aws:iam::aws:policy/service-role/AWSLambdaBasicExecutionRole

$ aws iam put-role-policy \
    --role-name IngestionLambdaExecutionRole \
    --policy-name SSMAccessPolicy \
    --policy-document '{
        "Version": "2012-10-17",
        "Statement": [
            {
                "Effect": "Allow",
                "Action": "ssm:GetParameter",
                "Resource": [
                    "arn:aws:ssm:us-east-1:'"$ACCOUNT_ID"':parameter/analytics/redpanda/username",
                    "arn:aws:ssm:us-east-1:'"$ACCOUNT_ID"':parameter/analytics/redpanda/password"
                ]
            }
        ]
    }'
Then we can create the lambda. Make sure to replace REDPANDA_BROKERS with the bootstrap server URL you can find in the Redpanda Web UI, under overview → Kafka API.
$ aws lambda create-function \
    --function-name analytics-event-ingestion \
    --runtime provided.al2023 \
    --role arn:aws:iam::${ACCOUNT_ID}:role/IngestionLambdaExecutionRole \
    --handler bootstrap \
    --zip-file fileb://lambda.zip \
    --timeout 30 \
    # uncomment if building on arm, for example on a M1 Mac
    # --architectures arm64 \
    --memory-size 128 \
    --environment Variables='{KAFKA_BROKERS={REDPANDA_BROKERS},KAFKA_TOPIC=analytics,KAFKA_USERNAME_PARAM=/analytics/redpanda/username,KAFKA_PASSWORD_PARAM=/analytics/redpanda/password}'
Setting up API Gateway
Now that we have the lambda deployed, we need to create an API Gateway to expose it publicly.
(if not in us-east-1, specify the same region you deployed the lambda into):
$ export API_ID=$(aws apigatewayv2 create-api \
    --name "Analytics Ingestion API" \
    --protocol-type HTTP) | jq '.ApiId'

$ export INTEGRATION_ID= $(aws apigatewayv2 create-integration \
    --api-id ${API_ID} \
    --integration-type AWS_PROXY \
    --payload-format-version 2.0 \
    --integration-uri arn:aws:lambda:us-east-1:${ACCOUNT_ID}:function:analytics-event-ingestion \
    | jq '.IntegrationId'

$ aws apigatewayv2 create-route \
    --api-id ${API_ID} \
    --route-key "POST /ingest" \
    --target integrations/${INTEGRATION_ID}

$ aws apigatewayv2 create-stage \
    --api-id ${API_ID} \
    --stage-name production \
    --deployment-id $(aws apigatewayv2 create-deployment --api-id ${API_ID} --query 'DeploymentId' --output text)

$ aws lambda add-permission \
    --function-name analytics-event-ingestion \
    --statement-id AllowAPIGatewayInvoke \
    --action lambda:InvokeFunction \
    --principal apigateway.amazonaws.com \
    --source-arn "arn:aws:execute-api:us-east-1:${ACCOUNT_ID}:${API_ID}/*"
Finally, we should be able to test it
$ curl -XPOST https://${API_ID}.execute-api.us-east-1.amazonaws.com/production/ingest \
      -d '{"msg": "test"}'
ok
Then we should see event in the Redpanda console

Something went wrong? Got an error response to the HTTP request, or didn’t see the message appear in Redpanda?
The first step to investigate is to look at the Cloud Watch logs for your lambda. If that doesn’t make the problem clear, you can try enabling detailed logging for the Rust code, by adding RUST_LOG=trace to the environment variable list.
Deploying Arroyo
Now we have our events in Redpanda, we can consume them with Arroyo and write them to S3 as efficient parquet files.
We have a few options for how to run Arroyo. For most production deployments, we recommend running on Kubernetes, and that’s the method we’ll run through in this guide. However, for small event streams Arroyo can be run cheaply and easily directly on a container runtime, like Fargate as a pipeline cluster.
We’ll assume you already have an EKS cluster, with kubectl set up to communicate with it. If not, you can create one by following the AWS setup guide.
Before we can deploy Arroyo, we need to create an S3 bucket to store checkpoints (which Arroyo uses to recover on failure) and the parquet files we’ll write out.
We can create the bucket like this (choosing your own name for the bucket; bucket names must be globally unique).
$ aws s3api create-bucket \
    --bucket arroyo-analytics-ingestion
(this will create a bucket in us-east-1—if you wish to use another region, pass --create-bucket-configuration LocationConstraint={REGION}).
There are various ways we can give Arroyo (or any other application running in EKS) access to our bucket. Next we need to create an IAM role that has access to the bucket. We’ll use IRSA (IAM Roles for Service Accounts), a way to tie together Kubernetes’ service accounts with Amazon’s IAM role infrastructure.
First we’ll create the policy. Create a file called trust-policy.json with, filling in bucket name you choose
{
    "Version": "2012-10-17",
    "Statement": [
        {
            "Effect": "Allow",
            "Action": "s3:*",
            "Resource": [
                "arn:aws:s3:::{BUCKET_NAME}",
                "arn:aws:s3:::{BUCKET_NAME}/*"
            ]
        }
    ]
}
Then create it:
$ aws iam create-policy --policy-name arroyo-prod-pod-policy \
  --policy-document file://trust-policy.json
Before we can use IRSA, we need to enable the OIDC provider in our EKS cluster
$ aws eks describe-cluster --name {CLUSTER_NAME} \
  --query "cluster.identity.oidc.issuer" --output text
$ eksctl utils associate-iam-oidc-provider --cluster {CLUSTER_NAME} --approve
Then we can create a role for our Arroyo pods. Create a file with this content, called role.yaml:
kind: Role
apiVersion: rbac.authorization.k8s.io/v1
metadata:
  name: arroyo-prod-pod
rules:
 - apiGroups:
    - ""
   resources:
    - services
    - pods
   verbs:
    - create
    - get
    - list
    - watch
    - update
    - delete
    - deletecollection
 - apiGroups:
    - extensions
    - apps
   resources:
    - replicasets
    - replicasets/status
    - ingresses
    - ingresses/status
   verbs:
    - get
    - list
    - watch
    - create
    - update
    - delete
    - deletecollection
---
apiVersion: rbac.authorization.k8s.io/v1
kind: RoleBinding
metadata:
  name: arroyo-prod-pod-role-binding
  namespace: default
roleRef:
  apiGroup: rbac.authorization.k8s.io
  kind: Role
  name: arroyo-prod-pod
subjects:
- kind: ServiceAccount
  name: arroyo-prod-pod-sa
$ eksctl create iamserviceaccount --name arroyo-prod-pod-sa \
--cluster arroyo-prod --role-name "arroyo-prod-pod-role" \
--attach-policy-arn arn:aws:iam::${ACCOUNT_ID}:policy/arroyo-prod-pod-policy --approve
$ kubectl create -f role.yamlNow we’re ready to deploy Arroyo, via the helm chart.
We’ll create a values.yaml file with our config overrides
artifactUrl: "s3://{BUCKET_NAME}/artifacts"
checkpointUrl: "s3://{BUCKET_NAME}/checkpoints"

serviceAccount:
  create: false
  name: arroyo-prod-pod-sa

role:
  create: false
And use that to deploy our Arroyo cluster. (You will first need to set up Helm locally. Follow the instructions here to get a working Helm installation.)
$ helm repo add arroyo https://arroyosystems.github.io/helm-repo
$ helm install arroyo arroyo/arroyo -f values.yaml
This will take several minutes to roll out. Once it’s ready, you should see something like this:
$ kubectl get deployment arroyo-controller
NAME                READY   UP-TO-DATE   AVAILABLE   AGE
arroyo-controller   1/1     1            1           5m
Arroyo relies on a postgres database to serve as its config store, and to back the API and control plane. By default, the helm chart will deploy a postgres node, but for production deployments you may wish to use a separate, managed postgres, like RDS. See instructions on how to do this in the docs.
With that, we should have a working Arroyo cluster running in Kubernetes. We can connect to it with a port-forward
$ kubectl port-forward service/arroyo 5115:80Then open http://localhost:5115.
Ingesting to S3
Now we’re ready to cook. In the Web UI, click the Connections tab, then Create Connection. Find Kafka, and click Create. We’ll create a connection profile, which tells Arroyo how to connect to our Redpanda cluster.
Click Create New and fill out the details of your redpanda cluster:

Click Validate, and you should see a success message. Create the profile.
You may notice that we’re typing in our password here, which will then be stored in Arroyo’s config database. This is convenient, but not very secure. A better approach is to store the password as a Kubernetes secret, inject it into the pod as an environment variable, then use the environment variable here instead of the actual password.
More details on how to set this up in the docs.
Next we’ll create a pipeline. Go to Pipelines→Create Pipeline. This presents a SQL interface that we can use to type our queries. We’ll start by creating a table using the connection profile we created.
create table events (
  value JSON
) with (
    connector = 'kafka',
    connection_profile = 'analytics-redpanda',
    topic = 'analytics',
    format = 'json',
    'json.unstructured' = true,
    type = 'source'
);

select * from events;
Preview the pipeline, then send some events to your endpoint. You should see them flow through.
Designing the schema
We now have to make some decisions about how to schematize our data. There are many options here and could be the subject of many blog posts. For now, I’ll assume we’re using JSON with a fairly simple schema that looks like this:
{
  "id": "687ed5c8-908d-467f-97e6-54bd83d9d170",
  "timestamp": "2025-01-15T17:24:53Z",
  "ip": "129.168.5.15",
  "user_id": "bob_smith11",
  "platform": "ios",
  "app_version": "v1.12",
  "type": "account_created",
  "properties": {
    "signup_method": "email",
    "campaign_id": "WINTER2025",
    "product": "premium"
  }
}
So we have:
- A unique id (in this case, a UUID)
- Common metadata
- An event type
- Properties of the event that are specific to that event type
Next we need to decide if we’re going to schematize (i.e., structure with specific fields) the property data at ingestion time or at query time. There are advantages to each. If we schematize up-front (commonly called a shift-left approach) we guarantee that all of the events in our data lake have the proper fields which makes data engineering much easier; we also get much better performance and better compression from turning our row-based JSON into columns. On the other hand, schema changes become much harder, requiring a redeploy of our analytics stack.
Whichever direction we go, we’ll start with a source like this:
create table events (
    id TEXT PRIMARY KEY,
    timestamp TIMESTAMP NOT NULL,
    ip TEXT,
    user_id TEXT,
    platform TEXT,
    app_version TEXT,
    type TEXT NOT NULL,
    properties JSON
) with (
    connector = 'kafka',
    connection_profile = 'analytics-redpanda',
    topic = 'analytics',
    format = 'json',
    type = 'source'
);
This partially parses the common fields, while leaving the event-specific properties as unparsed JSON.
The Arroyo JSON parser relies on a very efficient “tape” data structure, inspired by simdjson. This has a number of nice properties when parsing row-based JSON into column-based arrow records, among them that we can include unparsed JSON fields like the properties column here as a simple copy from the source, without actually needing to parse and re-serialize it.
Sinking to S3
Now we’re ready to sink our events to S3. If we want to take the unschematized approach, we can just write exactly those fields from our source. If we want instead to schematize, we’ll create a sink table for each event, and insert into it our parsed fields.
For our account_created event, it will look like this:
create table account_created_sink with (
    connector = 'delta',
    path = 's3://{S3_BUCKET}/data/account_created',
    format = 'parquet',
    'filename.strategy' = 'uuid',
    parquet_compression = 'zstd',
    time_partition_pattern = '%Y/%m/%d/%H',
    rollover_seconds = '6000'
);

INSERT INTO account_created_sink
SELECT
	id,
	timestamp,
	ip,
	user_id,
	platform,
	app_version,
	-- these fields use the shorthand get_json_str syntax -->
	properties->>'signup_method' as signup_method,
	properties->>'campaign_id' as campaign_id,
	properties->>'product' as product
FROM events
WHERE type = 'account_created';
We have a number of options we can configure on our sink. We can choose to use Delta Lake (with the delta connector) or just write raw parquet (or JSON) files to the bucket (with the filesystem connector). We can choose the file naming strategy on S3 and add optional time or key partitioning.
We can also configure the rollover seconds, which controls how long we keep files open before starting a new one. This gives a tradeoff between ingestion latency (how long you have to wait before the file is queryable) and minimum file size, which improves query performance. (Many streaming engines, like Flink, tie their fault tolerance mechanism to the file rollover time—in other words, they have to rollover every time they checkpoint, making you choose between fine-grained recovery or lots of files—but Arroyo has done the hard work of solving that).
And that’s pretty much it. Follow this pattern for all of your events and you’ll end up with a working, efficient data lake ingestion pipeline.
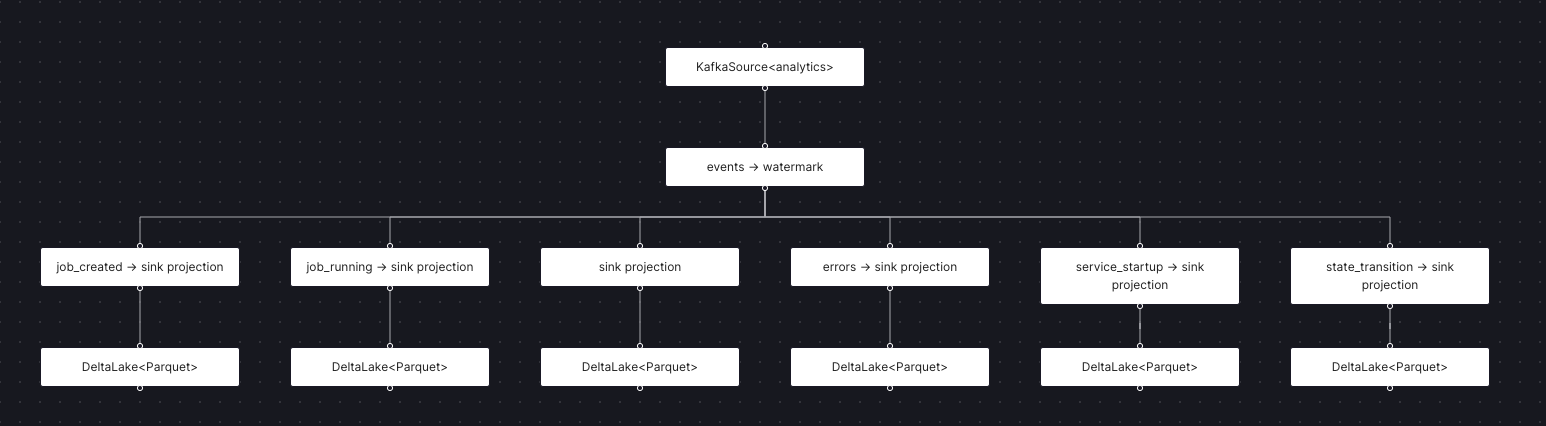
The Arroyo analytics pipeline
Querying our data lake
Now comes the fun. Our data lake is being filled with data, and we’re finally ready to do something with it. There are many, many tools that can query delta files on S3, including Spark, Trino, and Clickhouse. At Arroyo, we’re big fans of DuckDB for this—it shares our focus on small, fast, single-binary tools that are easy to deploy and operate.
We can install DuckDB on an EC2 node or a Kubernetes pod and use the CLI, but I prefer using it with the Python binding in a notebook interface, as that makes it easy to script queries and plot their outputs.
And instead of setting up the infrastructure for this ourselves, we can use AWS SageMaker Notebooks, a managed JupyterLab service, for which Amazon charges just about 10% on top of the instance costs.
Setting it up is easy with a few AWS CLI commands
$ aws iam create-role \
    --role-name SageMakerRole \
    --assume-role-policy-document '{
      "Version": "2012-10-17",
      "Statement": [
        {
          "Effect": "Allow",
          "Principal": {
            "Service": "sagemaker.amazonaws.com"
          },
          "Action": "sts:AssumeRole"
        }
      ]
    }'

$ aws iam attach-role-policy \
    --role-name SageMakerRole \
    --policy-arn arn:aws:iam::${ACCOUNT_ID}:policy/arroyo-prod-pod-policy

$ aws sagemaker create-notebook-instance \
    --notebook-instance-name analytics-notebook \
    --instance-type ml.m7i.2xlarge \
    --role-arn arn:aws:iam::${ACCOUNT_ID}:role/SageMakerRole
That will create a role for the notebook, allow it to read from our S3 bucket, then create a notebook with an m7i.2xlarge instance type (adjust this up or down depending on how much memory you need for your data).
Next we must wait for the notebook to be created, which may take several minutes. When it’s ready, this command will return InService:
$ aws sagemaker describe-notebook-instance \
    --notebook-instance-name analytics-notebook \
    --query 'NotebookInstanceStatus' \
    --output text
At that point, we can get a URL to our notebook
$ aws sagemaker create-presigned-notebook-instance-url \
  --notebook-instance-name analytics-notebook
Open up the URL that’s returned. Now we can connect to our data in S3:
!pip install duckdb

import duckdb

con = duckdb.connect()

con.execute("""
CREATE SECRET secret (
    TYPE S3,
    PROVIDER CREDENTIAL_CHAIN
);
""")

con.sql("""
    CREATE TABLE account_created AS
    SELECT * FROM delta_scan('s3://arroyo-prod-checkpoints/data/account_created')
""")

con.sql("select count(*) from account_created")
┌──────────────┐
│ count_star() │
│    int64     │
├──────────────┤
│         5687 │
└──────────────┘
Or we can use matplotlib to chart our data, for example
import pandas as pd
import matplotlib.pyplot as plt

df = con.sql("""
SELECT
    DATE_TRUNC('day', epoch_ms(timestamp)) AS creation_date,
    COUNT(*) AS account_creations
FROM
    account_created
GROUP BY
    creation_date
ORDER BY
    creation_date;
""").df()

plt.figure(figsize=(10, 6))
plt.plot(df['creation_date'], df['account_creations'], marker='o', linestyle='-', label='Accounts Created')

plt.xticks(rotation=45)
plt.grid(True)
plt.legend()

plt.tight_layout()
plt.show()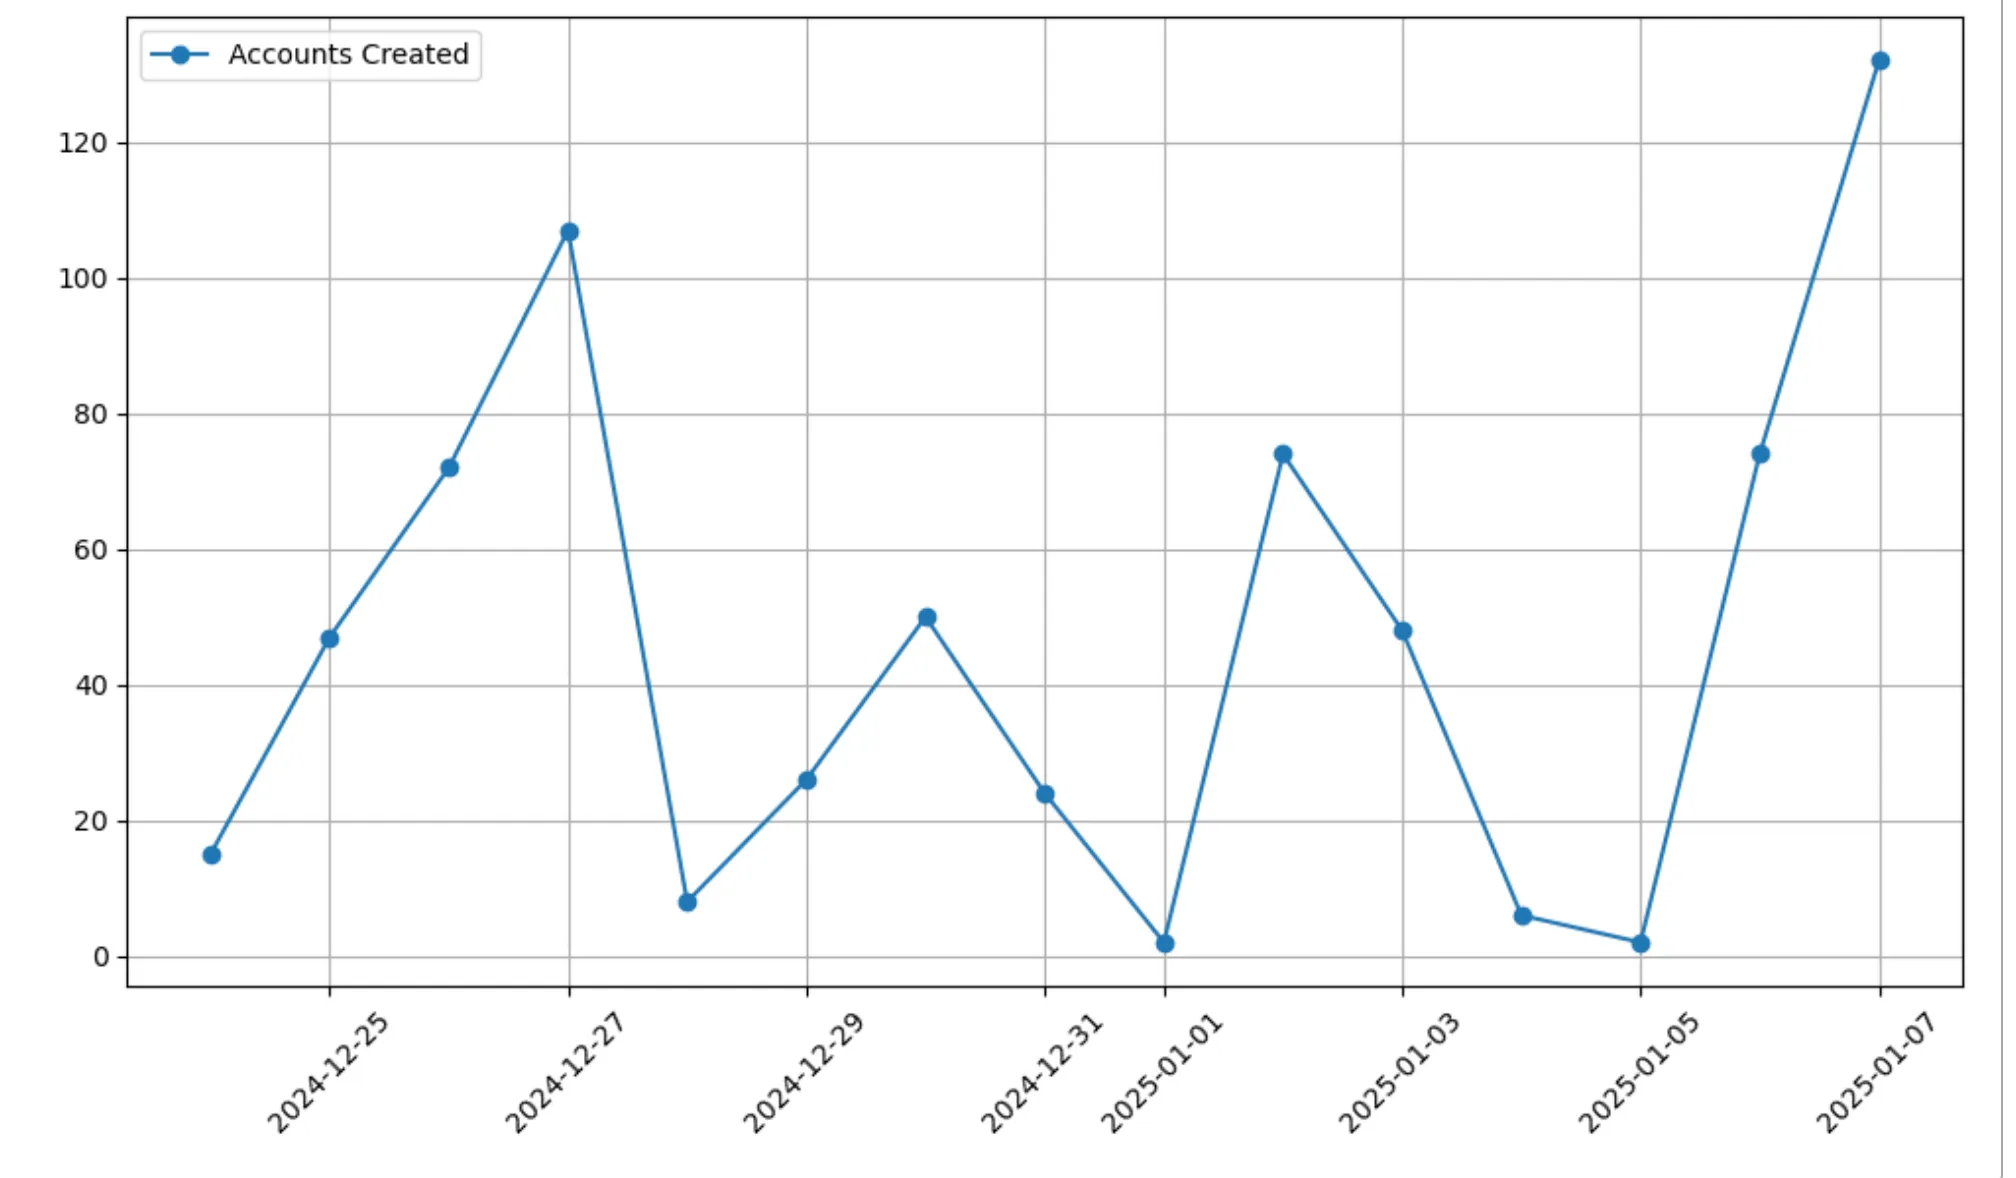
Once you’re done with your analyses, make sure to shut down the notebook to avoid unnecessary costs:
$ aws sagemaker stop-notebook-instance \
  --notebook-instance-name analytics-notebook
Wrapping up
And that’s it! We’ve built an end-to-end, low-latency data lake using a mix of managed services and open-source tools that will cost a small fraction of Databricks or Snowflake.
Where to go from here? At some point, you will want automated compaction of the delta files, as the near-real-time ingestion will still end up producing more files than is optimal for querying performance. This can be done with Spark or the delta-rs library.
Now that you have your data in Arroyo, you can also start building real-time dashboards and other tools using Arroyo’s powerful aggregation and windowing functionality.
If you’re looking to join the set of amazing companies ingesting with Arroyo, get in touch via email or Discord.